Showing posts with label log cabin. Show all posts

Sunday, 28 February 2016

OQD


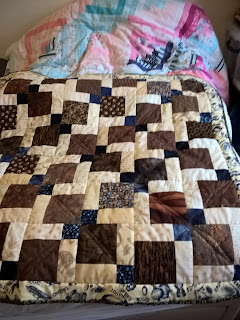
This week I have had obsessive quilting disorder, I finished another one!
Half and half backing..............


Last stitch in, aagh! A buried safety pin. Just have to sew the seam back up. Rest of the quilt now checked for other spiky prisoners. Loving the border and binding.


Quilted in the ditch with some surface detail. Not bad for orphan blocks.

I think Paddy will like it.  

The pink and blue log cabin is a duvet cover I made over 20 years ago, still going strong, though I had to replace the recycled sheet backing once.  It's nicely faded and soft now.

Sunday, 20 October 2013

Isle of Man calling.....


These blocks haven't see the light of day since last Christmas. I was fed up with hexies and needed another hand sewing job.  I need at least 100 for a quilt top.


There is no wadding in this quilt. The  10 1/4" backing squares are cut from a variety of fabrics that I had multiple yardages of and will coordinate in the finished top, after a fashion.   I draw diagonal lines on the wrong side of the backing and the 3 1/2" centre square so I can stick a pin through and line them up properly.

This project evolved as a way  to use up ugly greens and clothing-I have got to the stage where I can't throw things out at all, they have to be re-purposed.   The strips are all 2", not cut to length before I start.   The cream strips have duvet covers, pillow cases, accumulated charity shop shirts, my shirts, my mums, colleagues and some cotton quilting fabrics too.  I'm not fussy about using all cottons in this, as its meant to be a utility quilt.  The centre squares I'm using at the moment come from a top I picked up in a 50p bin at a charity shop-the red square is meant to represent the 'fire' in the cabin and this fabric is flame-like!

It is pieced around the centre in the same way as a traditional log cabin, the diagonal lines on the backing help you keep things straight. Once a strip is sewn down, using thread that blends with the backing (you don't see stitching on the front), fold it towards the edge, 1/3 on the bottom, 2/3 of the strip on top, giving a 2/3" overlap.  When I get to the last round, I tack down the last fold.  The backing is about 1/8 to 1/4" larger than the front. Traditionally this is all done by hand, however, I will probably sew the backing together on the machine, then fold and tack the top joints and sew them down with a decorative machine stitch.

The sewing part is really quick, its the lining up and folding for accuracy that takes the time-whilst I'm watching TV, each block takes about 2 1/2 hours.

Additional info here:

 http://needlemenow.blogspot.co.uk/2012/02/new-handwork-in-february.html


Saturday, 15 June 2013

Play date with VE1

I have been thinking about this photo of a vitreous enamel sample plate for a month, so today I played.

No planning, I dragged out a few blues and I was off, making it up as I went along.

All the yellows were pre-cut so I went with the sizes I had for the yellow blocks.


I'm not really a wall hanging kind of girl. I do need to experiment more and there is no point in leaving things in a plastic bin, so this will be my first wall hanging.  There are plenty of plain walls to hang it on as I don't have pictures up either!
#1  Log cabin construction

The colours are a bit bleached in this photo.  Simple log cabin construction to be enhanced with machine quilting after I have sketched from this book.....


#2  Strings

The blue string bin was out,  so that one was next.  I have to force myself to deviate from the original brief and get creative, it's not a easy process for ma at all. I'll just have to practice (;@]


I needed to use up some old blue curtaining........
#3  Curtains and rectangles


#4  Big squares

 Next........................


#5  Reflection


And finally.......the light blue centre picks up the reflected skylight in the original photo.  I'm not sure about the borders, they were just what I had leftover.

I could go on for a week on this theme, planning and sewing more samplers!  I'm happy I have had a creative splurge and now I can get on with unfinished projects, having started yet another one!


Friday, 28 December 2012

I couldn't resist

It will only take a couple of hours........


9 1/2" background square  and a pre-cut 3 1/2" square, wrong sides together and centred.

A rummage in the 2" strip bin......and a bit of hand stitching....I have pulled out browns for the backing squares, from tan to dark brown
with some judicious folding...
Each strip is folded so the first third matches the 2nd third, leaving the last third to be sewn down on the next round. It's stitched in a spiral, through all thicknesses.  I used thread that matched the back so you can't see the stitches-it's difficult to get them even as you stitch through three thicknesses, five layers on the corners.

The finished block, using up some uglies.  These blocks will be mixed fabrics, using up some poly-cotton light coloured shirts that I had donated from a colleague.  I'll slip a few other fabrics in there too, I have some silk and lining and curtain fabric to use up. 
There are three green shirting strips in here. I'll also get to use up that hideous bear paw print fabric (the picture was misleading, I bought 3 bargain metres!!). It looks like cut off paws, not prints!

The backing is a smidgen too small for comfort for when the blocks are joined, so I have cut the next four at 9 3/4"-another dodgy buy, the pattern was much bigger than I thought it would be!
I worked out the finished quilt will weigh about 5 1/2 lb, not as much as I thought. 

One more block, then its going away!


Saturday, 15 December 2012

Ah! A use for the non-cotton clothing items that I currently throw out!

Oh, ANOTHER long term WIP!

I have just watched an episode from season 10 on The Quilt show, where Pepper Cory demonstrates an early log cabin technique from the Isle of Man in the UK, called locally a 'tile' log cabin.   I  don't like throwing out poly-cottons, or other fabrics when the clothing has passed it's best so here is what I'll be using them for!


I found machine instructions on the ludlowquiltandsew.blogspot.co.uk.   

I think I will be using Pepper's hand technique as its portable and I like the idea of traditional handwork.   There is some more information on her blog.   Now to beg for castoffs on Facebook.......

Good job there's no one to say stop! 


Friday, 15 July 2011

Log cabin inspiration

I always have my camera in my bag-I have carried it every day for years.  I take the kind of pictures that others think odd. Oh well! I saw this trolley full of engraving laminate waste at work,it screamed 'modern log cabin' design. It will join the archive of dozens of other design pictures I have and one day it may make it to the drawing board!  I like the line of yellow hazard tape on the floor and the simplicity of red, blue, gold and silver lines.